February has been a slow month in the hobby front for me. Sometimes it’s work, other times it’s procrastination getting the best of me but in the end the result is the same: little time spent on substantial things and increasing the number of WIP projects. This weekend has been no different – I put off a lot of my backlog in favor of another kit out of whim. Check out some visuals of this new endeavor after the jump.
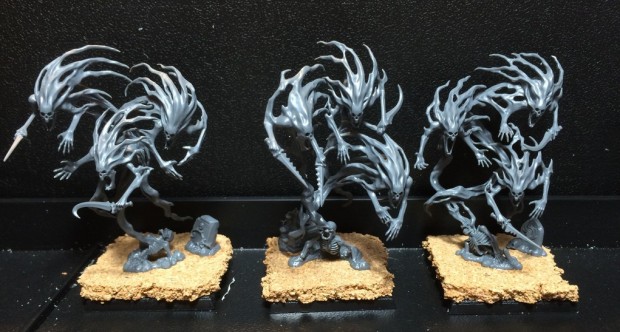
Right, this time I got some Spirit Hosts on my work space. The kit is very detailed and looks great when assembled even without paint on it. However, putting it together is a real pain especially since the connecting parts are really fragile and the connection buds aren’t obvious at all times. Thus I recommend sticking to the manual given with the models.


Unlike other models I wanted to finish the bases as well. Since these are for display for the moment I opted for a scene that stands a little higher than usual. In case I ever decide to put them on auction I thought of the players too and designed the base so that the edges can touch each other.


Apparently I didn’t take pictures of the first hosts but the methods and problems associated with the rest of the kit are the same: ridiculous mould lines (check every hole and trail as they run everywhere), fragile pieces and GW’s interesting approach at connecting pieces at the most delicate pieces like wrists of spirits or the trail that follows them. When putting this together I recommend using precision tools – the mould line remover is out the window here. Work with a scalpel for mould lines, a file to flatten join lines (or use Liquid Green Stuff if you’re good with a brush) and use a pin headed glue, like Revell Contacta Professional.


Speaking of delicate pieces, I managed to break a piece cleanly in two. Luckily it’s easy to repair with plastic glue as it cements pieces, and the actual sub-assembly would be supported by its connection point.

SNAP! Be very careful when cleaning this piece of mould lines.
Here’s a few shots of the building process with my comments. It took me about 2 dedicated nights to finish the bases, the models and the accessories so nothing stops me from priming them now. Let’s hope the glue cured correctly!


Once assembled the kit looks fantastic. Everything clicks into place and the model makes sense. However I can already see that painting and correcting join lines will be a huge pain, so many pieces overlapping and putting the brush in will be difficult. Sub-assemblies were really not an option as it’s almost impossible to track shaded areas and highlights without putting them together. This will be quite a challenge for me for sure… but I welcome it. It will be my training for my ultimate objective, I guess you can guess what I have in mind.
I also worked on the metal Varghulf a little… and made a mess of superglue everywhere. No shots of that mess of course since I didn’t want to permanently adhere my phone to my fingers! I will show some end results at a later post however, once I’m done with the Green Stuff corrections.
See you on the next post!

Wow…those are some fiddly models. I do not envy cleaning up those mould lines. It’s gotta be really important on these guys though…i imagine a variety of their work will involve washes and dry brushing, and it will be difficult to get the brush in certain areas…the second you dry brush, those mould lines pop like crazy!
I would like to see a post of “to be painted” group. It’s gotta be getting pretty big!
LikeLike
The brushwork will be a challenge for certain yes… I hope I’ll get to that by the end of this week when I can prime the models. However we’re having terrible weather now and it doesn’t look nice for a spraying session outside.
I’m afraid to make a tally of the parallel projects but perhaps I can get some stuff out of the way during this storm!
LikeLike
I did some Spirit Hosts last year, nightmare like you say – particularly as one lot wouldn’t really connect properly, so I ended up trying to greenstuff them together (unconvincingly!)
For me, it was an exercise in washes: undercoated with Skull White, then just used Druchii Violet and Drakenhof Nightshade. Even the graves etc were washed rather than painted, now that I come to think about it…
Anyhow, enjoy! I look forward to seeing your results!
LikeLike
They look pretty sweet Spalanz! I would have worked a few more highlights in but getting them done through just shades is pretty impressive altogether!
LikeLike
I feel you buddy, it hasn’t been above 0C for what seems like a week now! It’s -9C right now, and we had -30C wind chills just the other day! I can’t seal the stompa 😦
LikeLike
Thanks! I hadn’t been painting much by that point, so didn’t have the confidence! Looking forward to seeing yours done anyway!
LikeLike